
Controlling Blender Shapekeys using Three.js
Controlling Blender Shapekeys with Threejs: “Pariah”
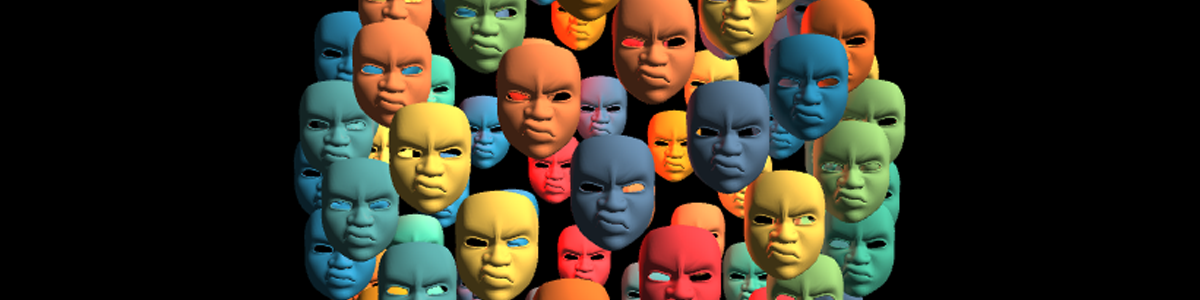
🎯Where we’re headed🎯
Did you know you can control shapekeys from Blender in Threejs? In this tutorial, I’ll walk you through Blender so much more user-friendly when it comes to vertex This one seemed to strike a chord with people - it got 5x my usual (small) viewership on YouTube. The creative coding
🏗️The Building Blocks🏗️
Before we dive in, let’s get our environment set up.
🔨Software/Tools🔨
- This Three.js template I’ve been adding to over time
- Blender - I used version 4.5.2 but apparently it’s been in there since Blender 2.4, December 2005
- Visual Studio Code
🦆Prerequisites🦆
This is NOT a beginner tutorial in Three.js or Blender. I’m assuming:
- Basic familiarity with the Blender interface
- Familiarity with the threejs set up and structure (see other helpful links below)
- You already know how to use lil-gui for a basic ui interface
💪The Core Technique💪
The short answer is this pair of functions
/**
 * Sets a specific shape key's influence value on a Three.js mesh.
 * This function checks if the mesh has morph target influences (the Three.js equivalent of shape keys)
 * before attempting to set the value. This prevents errors on meshes that don't have them.
 *
 * @param {THREE.Object3D} face - The parent object of the mesh containing the shape keys (the GLTF scene object).
 * @param {number} shapekey - The index of the shape key to modify. This corresponds to the order in which the shape keys were created in the 3D software (e.g., 0 for the first one).
 * @param {number} value - The influence value to set: a number between 0.0 and 1.0.
 * @returns {void}
 */
function setShapekeyValue(face, shapekey, value) {
    if (face.children[0].morphTargetInfluences) {
        face.children[0].morphTargetInfluences[shapekey] = value;
    }
}

/**
 * Smoothly transitions between two shape keys on a Three.js mesh.
 * This function uses a value (e.g., from an animation or slider) to simultaneously
 * increase the influence of one shape key while decreasing the influence of another.
 *
 * @param {THREE.Object3D} face - The parent object of the mesh containing the shape keys (the GLTF scene object).
 * @param {number} shapekeyStart - The index of the starting shape key (the one whose influence will decrease).
 * @param {number} shapekeyEnd - The index of the ending shape key (the one whose influence will increase).
 * @param {number} value - The transition value, typically a number between 0.0 (start shapekey is fully active) and 1.0 (end shapekey is fully active).
 * @returns {void}
 */
function transitionShapekeys(face, shapekeyStart, shapekeyEnd, value) {
    setShapeKey(face, shapeKeyEnd, value);
    setShapeKey(face, shapeKeyStart, 1 - value);
}
Step 1: Set up shapekeys in Blender
What even are shapekeys though?
Shapekeys are like poses for vertices in your mesh relative to some base position. So, in Blender, you set up the Basis and then add as many shapekeys as you like for, in my case, the whole face. These are controlled by a value between 0 and 1 where 0 is the basis and 1 is the fully realised mesh
- Gif showing shapekeys being controlled
This is WAY simpler and lightweight than facial riggings
- Blender rigify image
Transitioning from one shapekey to another without passing through the basis
All shapekeys are defined relative to the basis i.e. neutral face so how do we transition smoothly between two expressions eg: from smiling to frowning without needing to get to the rest position in between?
Simple: transition one expression from 0.0 to 1.0 at the same time as we transition the other from 1.0 to 0.0
Shapekeys in other 3D software
| Software | Term for Shape Keys | Common Use Case | |:—:|:—:|:—:| | Blender | Shape Keys | Facial expressions, muscle deformation, and object transformation. | | Autodesk Maya | Blend Shapes | A widely used term, particularly for rigging and facial animation. | | Autodesk 3ds Max | Morpher Modifier | A specific modifier used to create and control multiple “morph targets.” | | Cinema 4D | Morph or Pose Morph | The “Pose Morph” tag is used to store and animate different mesh positions. | | ZBrush | Morph Targets | A core feature for saving and blending between different sculpted states. | | Unreal Engine | Morph Targets | Used for importing and animating shape deformations from other software. |
Blender Human Base Meshes
For this project, I used the Blender Foundation’s Human Base Meshes asset pack because making my own topology seemed like far too much work. They already have great topology - something I’m still learning to do for myself.
To keep my sketch super light-weight, I deleted all the faces I knew I wouldn’t need. Note: you need to do this BEFORE you set up the shape keys.
Step 2: Export as GLB
Make sure you have y axis as up and include only the mesh we’re after in your export.
- Blender picture
Step 3: Import into your Three.js scene
/**
 * Loads a GLTF model, applies a material, and positions it in the scene.
 * This function loads the 'Pariah.glb' file, iterates through its meshes
 * to apply a new color, and sets its position and orientation in the scene.
 *
 * @param {number} colour - The color to apply to the model's material. This should be a hexadecimal number (e.g., 0xffffff for white).
 * @param {number} x - The x-coordinate for the model's position.
 * @param {number} y - The y-coordinate for the model's position.
 * @param {number} z - The z-coordinate for the model's position.
 * @returns {void}
 */
function loadBiz(colour, x, y, z) {
    gltfLoader.load(
        'Pariah.glb',
        // --- On Load Callback ---
        function (gltf) {
            console.log('Model loaded successfully!', gltf);
            let newLocalScene = gltf.scene;

            // Traverse the scene to find all meshes and apply a new material
            newLocalScene.traverse((child) => {
                if (child.isMesh) {
                    child.material = new THREE.MeshStandardMaterial({ color: colour });
                    child.castShadow = true;
                    child.receiveShadow = true;
                    child.material.needsUpdate = true;
                }
            });

            // Set the model's position and orientation
            newLocalScene.position.set(x, y, z);
            // newLocalScene.scale.set(5); // Example of a scaling option
            newLocalScene.lookAt(camera.position);

            // Apply a specific shape key value
            setShapekeyValue(newLocalScene, 0, 1);

            // Add the model to the main scene and an array
            scene.add(newLocalScene);
            allFaces.push(newLocalScene);
        },
        // --- On Progress Callback ---
        function (xhr) {
            const percentLoaded = (xhr.loaded / xhr.total) * 100;
            console.log('Model ' + percentLoaded.toFixed(2) + '% loaded');
        },
        // --- On Error Callback ---
        function (error) {
            console.error('An error happened while loading the model', error);
            // Example for showing a user-facing error on the loading screen
            // loadingScreen.style.backgroundColor = '#880000'; // Indicate error
            // loadingScreen.innerHTML = 'Error loading model. Check console for details.';
        }
    );
}
Making sure shapekeys will work
newLocalScene.traverse((child) => {
    if (child.isMesh) {
        child.material = new THREE.MeshStandardMaterial({ color: colour });
        child.castShadow = true;
        child.receiveShadow = true;
        child.material.needsUpdate = true;
    }
});
The material.needsUpdate flag is the key here
How do we arrange the faces?
I used this function generated by gemini to distribute them on the surface of a sphere
/**
 * Generates an array of points evenly distributed on the surface of a sphere.
 * This uses the Golden Spiral algorithm, which avoids the clustering at the poles
 * that occurs with simple spherical coordinate-based methods.
 * * @param {number} numPoints The desired number of points.
 * @param {number} radius The radius of the sphere.
 * @returns {Float32Array} A flat array of x, y, z coordinates.
 */
function generatePointsOnSphere(numPoints, radius) {
    const positions = [];

    // The golden angle in radians, approximately 137.5 degrees
    const goldenAngle = Math.PI * (3 - Math.sqrt(5));

    for (let i = 0; i < numPoints; i++) {
        // Calculate y position, mapping i to a range from -1 to 1
        const y = 1 - (i / (numPoints - 1)) * 2;

        // Calculate the radius of the circle at this y position
        const r = Math.sqrt(1 - y * y);

        // Calculate the angle using the golden angle
        const theta = i * goldenAngle;

        // Convert to Cartesian coordinates (x, z)
        const x = Math.cos(theta) * r;
        const z = Math.sin(theta) * r;

        // Push the scaled coordinates into the array
        positions.push(x * radius, y * radius, z * radius);
    }

    return new Float32Array(positions);
}
To load up the faces, first I got my Float32Array corresponding to the xyz positions Why Float32Array? If you’re making a point cloud in Threejs, that’s what you can feed in for a lightning fast GPU-accelerated shade render.
Now I just loop through, loading faces as we go and making them face the camera
spawnPoints = generatePointsOnSphere(totalFaces, 3);
for(let i = 0; i < totalFaces; i++){
    let ix = 3*i; // getting the index from the Float32 array
    loadBiz(random(palette), spawnPoints[ix], spawnPoints[ix+1], spawnPoints[ix+2]);
}
How do you set the material colour?
Emulating the random(arr) function from p5.js…
const random = (arr) => arr[Math.floor(Math.random() * arr.length)]
Then it’s a matter of making a standard material and applying it to the mesh. From the code above:
newLocalScene.traverse((child) => {
    if (child.isMesh) {
        child.material = new THREE.MeshStandardMaterial({ color: colour });
        child.castShadow = true;
        child.receiveShadow = true;
        child.material.needsUpdate = true;
    }
});
Where did I get my colours from?
If I were better at colour theory, I’d maybe make them myself, but I’d rather leverage the brilliant work of others: Vibrant Tones from Coolors.co
const palette = "#f94144, #f3722c, #f8961e, #f9844a, #f9c74f, #90be6d, #43aa8b, #4d908e, #577590, #277da1".split(", ");
Step 4: Controlling the shapekeys
Unpacking the two core functions:
function setShapekeyValue(face, shapekey, value){
    if(face.children[0].morphTargetInfluences) {
            face.children[0].morphTargetInfluences[shapekey] = value;
    }
}
The property of the mesh we’re after is morphTargetInfluences
It’s an array of all the shapekeys embedded in that mesh. Which order are they in? Apparently in the export from Blender, especially in earlier versions, they can get jumbled. See below for how to look up the shapekey by the name you gave them in Blender.
How do we swap directly from one expression to the other?
function transitionShapekeys(face, shapekeyStart, shapekeyEnd, value) {
    setShapeKey(face, shapeKeyEnd, value);
    setShapeKey(face, shapeKeyStart, 1 - value);
}
Note: Now as the “value” moves from 0 to 1, shapeKeyEnd goes 0 –> 1 at the same time as shapeKeyStart goes 1 –> 0
💪 YISSS 💪
However, also not that those two values are still independent normally. I came across this problem when flicking over to manual control mode. See below for how I handled that.
Manually setting the value
To test it out, if in manual mode, I can set the value with the lil-gui slider:
function animate() {
    requestAnimationFrame(animate);


    for(let face of allFaces){
        face.lookAt(camera.position); // update so they're always facing the camera
        if(params.manualControlMode){
					setShapekeyValue(face,params.shapekeyIndex, params.shapekeyValue);
				}
    }

    controls.update(); // Update controls (required for damping)
    renderer.render(scene, camera);
}
This slider is set up for values between 0 and 1
let params = {
    manualControlMode: false,
    shapekeyValue: 0,
		shapekeyIndex: 0,
    colour: new THREE.Color(0xffffff),
    debug: false,
    playSound: true
}
gui.add(params, 'shapekeyValue', 0, 1, 0.001);
The core mechanic: controlling the sneer by how much the user is looking at the face
for(let face of allFaces){
        face.lookAt(camera.position); // update so they're always facing the camera
        disgustLevel = isFacing(camera, face)
        easedDisgust = easeInExpo(disgustLevel);
        if(!params.manualControlMode) transitionShapekeys(face, 0, 1, easedDisgust);
        // if(params.debug) console.log(`${[face.position.x.toFixed(2), face.position.y.toFixed(2),face.position.z.toFixed(2)]} --> ${disgustLevel.toFixed(2)} --> ${easedDisgust.toFixed(2)} `);
    }
If only there was a mathematical function that gave us a measure of how much we’re looking at an object… Oh wait! That’s EXACTLY the vector dot product!
I did a mathematics degree back in the day, but linear algebra was never my strong suit. Claude.ai to the rescue:
/**
 * Calculates a normalized value (0-1) indicating how much the camera is facing an object.
 * A value of 1 means the camera is looking directly at the object.
 * A value of -1 means the camera is looking in the opposite direction.
 * @param {THREE.Camera} camera The camera object.
 * @param {THREE.Object3D} targetObject The object to check against.
 * @returns {number} The normalized value.
 */
function isFacing(camera, targetObject) {
    // Get the vector pointing from the camera to the object.
    const direction = new THREE.Vector3().subVectors(targetObject.position, camera.position);
    direction.normalize();

    // Get the camera's forward-facing direction vector.
    const cameraDirection = new THREE.Vector3();
    camera.getWorldDirection(cameraDirection);

    // The dot product of two normalized vectors gives the cosine of the angle between them.
    // A dot product of 1 means the vectors are pointing in the same direction.
    // A dot product of -1 means they are pointing in opposite directions.
    const dotDigust = cameraDirection.dot(direction);


    return dotDisgust;
}
Is it a problem that morphTargetValues expects values between 0 and 1? Nah, Three.js clamps the input behind the scenes.
How do we control how much we have to be looking at the camera to affect the sneer?
For the effect to truly shine, it needs to be super clear that it’s only when we’re looking at the faces that they show us disdain. If only there was a nice set of functions that are great for modifying values between 0 and 1… Wait, they’re called easing functions! I use Easings.net all the time.
Of the choices, we want something with a fast drop-off away from 1:
function easeInExpo(x) {
  return x === 0 ? 0 : Math.pow(2, 10 * x - 10);
}
Putting it all together, we get this animation loop which gets called each frame:
function animate() {
    requestAnimationFrame(animate);


    for(let face of allFaces){
        face.lookAt(camera.position); // update so they're always facing the camera
        if(params.manualControlMode){
					setShapekeyValue(face,params.shapekeyIndex, params.shapekeyValue);
					continue; // no need to calculate further
				}
				disgustLevel = isFacing(camera, face); // based on how much you're facing the camera, max disgust at head on
        easedDisgust = easeInExpo(disgustLevel); // drop off this value (i.e. smile) not too far from head on
        if(!params.manualControlMode) transitionShapekeys(face, 0, 1, easedDisgust);
    }

    controls.update(); // Update controls (required for damping)
    renderer.render(scene, camera);
}
🤔Troubleshooting🤔
Ooooh I have a lot of shapekeys… how do I get their index by their name?
In this example, I didn’t bother because I only had two shape keys: “smile” and “sneer” at indexes 0 and 1 respectively, but there’s another property of the mesh which is morphTargetDictionary
You could use the following function to extract the index by name.
/**
 * Finds the index of a morph target by its name on a given mesh.
 * @param {THREE.Mesh} mesh The mesh to search for the morph target.
 * @param {string} name The name of the morph target (shape key).
 * @returns {number|undefined} The index of the morph target, or undefined if not found.
 */
function getMorphTargetIndexByName(mesh, name) {
    if (mesh.geometry.morphTargetDictionary) {
        return mesh.geometry.morphTargetDictionary[name];
    }
    return undefined;
}
My shapekeys are out of order!
See above. Apparently they can get scrambled on export from Blender.
I’ve switched to manual mode, but now all my faces look like they’ve had a stroke
Ah! It may be that you’ve forgotten that the influence value for any given shapekey is independent. So when we flip to manual control mode, we’ll need to reset all the other shapekey values. For me, that meant adding this onChange function for when I toggled manualControlMode:
gui.add(params, 'manualControlMode').onChange(() => {
	 // set the influence of the one not in control
	 let otherExpressionInfluence = 1 - params.shapekeyIndex;
	 for(let face of allFaces){
		 setShapekeyValue(face, otherExpressionInfluence, 0);
		 setShapekeyValue(face, params.shapekeyIndex, params.shapekeyValue);
	 }
 });
🔗Other helpful links🔗
- Three.js Journey: Bruno Simon’s incredibly comprehensive guide to all things threejs
- Blender Human Base Meshes
- Coolors.co
- Easings.net
🫡Where to next?🫡
H
Feel free to ask questions in the comments below! Happy creating! 🎉